Tuesday, December 31, 2013

New Year's Eve Celebration


I haven't posted for awhile, even though we've done activities. It is New Year's Eve, and I wanted to do something special with the Little Man. I found several posts about countdown bags, but Spoonful had the cutest ones.  I created my own countdown activities, incorporating some of the print-outs from Spoonful. Hope the Little Man enjoys them and can stay up that late.


Here is my list for the countdown bags (clock templates from Spoonful):
5:00 Have a great dinner
6:00 Make a party hat and glasses (template from Spoonful)
7:00 Make special cookies
8:00 Make a noise maker (Adventures of J-Man and MillerBug) Tip: My husband helped me staple through the craft stick, too, so it would be sturdier. Also, stickers are great for kids who find it difficult to draw.
9:00 Decorate the house
10:00 Watch a fun movie
11:00 Make a wish list (template from Spoonful) or All About Me poster (see below)
12:00 Make a "toast" and Celebrate (pop bubble wrap)

There were many templates out there to review the year, but I created my own in Word. I inserted pictures into mine, too. I was actually surprised at some of his responses.


Saturday, April 27, 2013

Avengers Birthday Treats

Today we did part 2 of birthday celebration with grandparents. I spent several days making the little man’s birthday treats.

Of course, we had to have a cake. I was inspired by 2 different sites. For the inside of the cake: Crafting with Freckles. And for the outside of the cake: Big Fat Cook. However, the little man (and I) like chocolate. So, I decided that red velvet, blue velvet and white chocolate cake would be oh, so much better than plain white with food coloring. I got my velvet recipe from Divas Can Cook. For blue velvet, you just use blue food coloring instead of red. The white chocolate cake recipe came from Oleander+Palm. The velvet cakes were supremely moist and truly the best velvet I have had. The white chocolate cake was denser but a nice compliment to the velvet cakes. I used a chocolate buttercream for the outside and a stabilized whipped frosting for the middle. Buttercream in the middle may have been too overpowering.

Here is my creation:
Outside of the cake:
 
Inside of the cake:
 

So, normally this would be the extent of birthday dessert. However, I really wanted to learn how to “flood” a cookie. This was a good opportunity, as the Avengers theme was a good inspiration for sugar cookies. I learned how to flood cookies from Sweetopia's video. She has a very nice tutorial and recipe for royal icing. The sugar cookie recipe came from Foodfolio. I freehand cut the cookies (not having Avenger cookie cutters), but the inspiration came from mommyGAGA.

Here is my creation:
The little man insisted he had to have the Captain America cookie. J

Thursday, April 18, 2013

Superhero Birthday

Tomorrow is the little man’s birthday. We are not doing a big birthday party, but I wanted to do something really special for him. Right now, he is in love with anything "superhero." Searching Pinterest for superhero themed ideas, I came across Emily's Little World blog. I fell in love with her capes and masks. So, I called my mom and asked if it was feasible to make them for the kids in his daycare. I asked my daycare lady if she could get the kids’ favorite colors and first initials. Now, we just switched daycares, and I assumed there were about 10 kids. Turns out, there are 16, including my son. Oh, well. I really wanted to do the project. My mom made one extra cape to experiment with, so I made one for a special friend at church.

Here is our creation:
Little Man's Mask
 
His cape

Daycare Kids' Capes + 1 Special Friend

Daycare Kids' Mask
 
My mom made all of the capes, and I did all of the logos and masks. I appliqued the logos, so they would be sturdier.

I got the free mask template from Grosgrain. I used the Wolverine mask for my little man’s special mask and the Hulk mask for the other kids.

If you do an internet search, there are many free patterns for basic capes. We searched for one that was one whole piece, but choose the one that works best for you. I designed the logos, using Microsoft Word.
 

I am planning a special Captain America cake for our family celebration. Pictures to come. J

Tuesday, April 16, 2013

Disney Fun

My husband and I went to Disneyland without the little man. He is still too little to go on a lot of the rides, and we didn’t want him to be disappointed, especially with the new Radiator Springs Racer ride. We did bring back some great gifts. If you go, check out RideMakerz in Downtown Disney. They have awesome create-your-own cars and are the only existing store, according to the employees.

I love Disneyland and Disney World for so many reasons. This time we treated ourselves to things I don’t normally try. One was a Mickey Mouse chocolate chip cookie. Simple yes, but very good. So big that it took me 2 days to eat. I wanted to share a little Disney with the little man, so I searched for a similar cookie recipe. Love to Be in the Kitchen has a recipe which is not completely like the original but pretty satisfying. I didn’t take my time with the decorating. If I wanted it to look more professional, I would have used a bag or condiment bottle to stripe the cookie. The best part of making something like this, the little man helped me. He loves making cookies.

Here is our creation:


And of course, the little man loved it!

Next project: I didn’t try the caramel covered apples because the one store didn’t have them, but I plan to recreate the recipe in the future. This YouTube video from the Disney Parks actually shows how to make one:

http://www.youtube.com/watch?v=ZB35Cbs_kt4

Tuesday, February 19, 2013

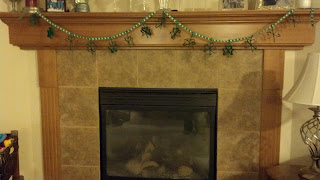
St. Patrick's Day Garland

I posted a similar project for Valentine’s Day. I did a simple modification for St. Patrick’s Day. First, I created hearts with paper towel tubes (see my post for Valentine’s Day for directions). Then, my little man painted them all green (with a little help from me). I used 3 hearts for each shamrock. The middle heart needs a hole punched on the top and on the bottom. Thread a pipe cleaner through the holes of the middle heart, creating a stem and a hanger. Once hearts are prepped, hot glue the 3 hearts together to form a shamrock. My little man attached the shamrocks to a ribbon, and then we hung it on our mantel.

Here is our creation:
 

Wednesday, January 30, 2013

Cotton Ball Ghost

My son loves Halloween. So, even though it is almost Valentine’s Day, he really wanted a ghost project. I did some searching and found my inspiration from No Time for Flash Cards.

First, I drew a simple ghost shape on cardstock. My little man cut it out. Again, we really need some cutting practice. (And still do.) He spread glue all over the ghost and put down cotton balls. I cut out some simple eyes and a mouth. Then, he glued that down. And voila! A very simple ghost.

Here is our creation:
 

Tuesday, January 29, 2013

Valentine's Day Heart Garland

The inspiration for this project came from Right Start Blog.
 
Since it is close to Valentine’s Day, the project was easily modified. To get the heart shapes, I folded one edge of my paper tube, using a butter knife (or you can use a bone folder) to get a nice straight edge. Then, I creased the top of the tube to get the heart shape. I cut 1” pieces. One paper towel tube gave me enough hearts, but it will depend on the size of garland you make.
 
I punched small holes at the top and bottom of each heart. Then, my little man painted them all red. If you are adventurous, like me, use acrylic paint for a nice coat. If you are not so adventurous, washable paint is fine but will need several coats.
 
Once paint is dried, cut standard pipe cleaners (chenille stems) in half. Make a small curl in the bottom and thread through holes. Make a loop at the top for hanging. Cut your ribbon to the length of your mantel (or however long you want your garland). I had my little man attach the hearts to the ribbon. And voila! A very simple but cute Valentine’s decoration.
 
This project lends to any color you desire. I chose a monochromatic design.
Here is our creation:

Sunday, January 20, 2013

Cutting Projects

Today’s project came out of the desire to teach my little man basic cutting skills. Over the years, I have seen some scary cutting in Kindergarten. Though, I admit I have been reluctant teaching him this skill after he cut the tip of his finger off at daycare over a year ago.
 
My goal was to work on proper grip and correct direction. He was not quite ready to hold the paper and turn it. That will come with more practice.
 
I found some great paper projects at education.com.
You can filter the site by project and by age group.
 

Here is the project we did:
 

If you are looking for some more complex projects, we found some great playsets at Spoonful, which is sponsored by Disney. My husband and my little guy had fun with the Avengers playset that I cut out.
 

Wednesday, January 9, 2013

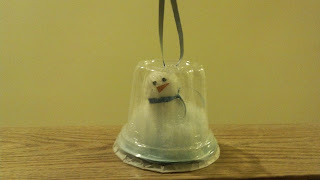
Waterless Snow Globe

I am still on a winter and snowman kick. So, I thought a waterless snow globe would be perfect.

I found several projects for snow globes. Some used glass jars, but I wanted something my little man could play with later. One site, The Rice Babies, had a nice simple idea.
 

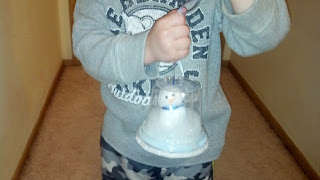
I used supplies that I had on hand. We had just gone to Dairy Queen, so I used the lid of the hot fudge sundae. Other supplies included wrapping ribbon, cotton balls, stuffing, card stock, muffin paper, and glitter. I cut a piece of card stock to fit snuggly in the bottom of the DQ lid and then used the muffin paper to completely seal the bottom off. My little man glued everything together (including putting the snowman together) and sprinkled glitter into the lid for just a nice extra touch.
 

Here is our project:

Sunday, January 6, 2013

Shape Snowman

The inspiration for this project came from Mamas Like Me.

She has a great blog post called 31 Days of January Crafts for Kids,” if you want some other great winter projects.
 

We love the book Snowmen at Night by Caralyn Buehner and have read it several times, so this project really connected to me. Also, I just did a project with shape pictures in my Kindergarten class. ☺
 

So, here is our shape snowman:

A Winter Scene

I was inspired for this project by Red Ted Art.
 
However, I wanted to step up the project just a bit. I had seen a few projects that used puffy paint. For a winter scene, I thought that would be perfect for snowflakes.
 
First, I cut out a tree and snowman and mounted them to our project paper.
 

Then, my little guy covered the whole picture with blue and purple finger paint.
 
Lastly, I mixed some homemade puffy paint. There are a lot of recipes out there, but I didn’t have the ingredients for the shaving cream version or self-rising flour for the other version. So, I did a little experiment. I used 2 Tablespoons all-purpose flour, 2 Tablespoons salt, ½ teaspoon of baking powder, and then added warm water until it was the consistency of paste. We used Q-tips to add the puffy paint snowflakes, and just for the fun of it, I went over the top of the snowman. We put it in the microwave for about 20 seconds (may be 10-30 seconds, depending on your microwave).
 
Here is our final creation:
 

Wednesday, January 2, 2013

Finger Puppet Theater

So, looking for fun craft projects online, my son saw a finger puppet theater from Katydid and Kid. It wasn’t a craft for him to do, but he does love imaginary play. (He did punch out some stars for me. ) So, I spent my day making the theater. This website had a great tutorial:

I didn’t have a dowel, so we used 2 straws pushed together.
 

I found some great free finger puppets from the Toymaker. (I am sure she would appreciate a donation for her great puppets.)
 

Here is our creation:

Tuesday, January 1, 2013

Salt Dough Halloween Figures

Halloween in January? I guess so. My son saw me searching through craft projects online, saw salt dough ghosts on All Free Crafts, and kept asking me to make some.
 

Salt dough is very versatile. You can make everything from ornaments, figures, to handprint/footprint keepsakes. The ideas are endless.
Tip: You can add paint to the mixture, but be aware that it fades tremendously. My suggestion is to paint when done instead.
 

Working with dough was great motor practice. I showed him how to squish, pinch, roll, and flatten. Then, I showed him how to make an eye with a toothpick, and he caught on pretty fast to make all of the features. We also used a small metal spatula for cutting and making lines.
 

I really thought that once I had the salt dough made that my son would forget about the ghosts he had seen. I was wrong. In fact, when he and I were done making a ghost a piece, he wanted pumpkins and a gate to go with them. He made some other figures, but I am posting the Halloween ones because they seemed to be a theme of his.

The ghosts and gates show what the dough looks like before being painted and before being completely dried. I painted the pumpkins, since the colored dough faded.
 

Here is our creation:
(My ghost is on the right.)
Side note: My son did love playing with the figures, too! ☺